C++で学ぶUnicodeの基本とUTF-8, UTF-16, UTF-32の相互変換アルゴリズム
広く使われているUnicode規格を理解し, エンコーディングの手法, UTF-8, UTF-16, UTF-32, を理解して, 多言語の文字コードを扱えるようになることを目指します. 具体的に, UTF-8, UTF-16, UTF-32間の変換方法をC++で実装し, 手法はできるだけ速い方法を用います.
はじめに
コンピュータで文字を処理するにあたり, Unicode規格が多く使われています[1]. 2021年4月でのW3Techsの調査によると, Webサイトで用いられる文字エンコーディングで, Unicode規格であるUTF-8が全体の96.7%を占めています[1]. Unicodeは情報技術規格で, 世界のほとんどの文字体系で表現されるテキストを一貫して符号化, 表現, 処理するために用いられています[2]. この規格は, Unicode Consortiumによって管理されており, 2020年3月現在, 143,859文字を有しています[2].
多言語に対応した文字コードの規格を標準に組み込まれたプログラミング言語は多くあります. 例えば, Pythonは文字列をUTF-8で扱っています[3]. C#は, 文字列をUTF-16で扱っています[4]. 標準で多言語に対応した文字コードをプログラミング言語に組み入れられることで, プログラマは簡単に多言語の文字を扱うアプリケーション(ゲーム等)を作成できます.
一部のプログラミング言語は, 標準で多言語の文字コードに対応していません. 例えば, C言語は文字を基本的にchar型の1バイトで表現します. C++では, 一部utf-8を取り入れる動きはあるものの, 完全に整備されていません[5]. これらの言語で多言語を扱いたいとき, 多言語の文字コードに対応したプログラムを自身で作成する必要があります.
本稿では, 広く使われているUnicode規格を理解し, エンコーディングの手法, UTF-8, UTF-16, UTF-32, を理解して, 多言語の文字コードを扱えるようになることを目指します. 具体的に, UTF-8, UTF-16, UTF-32間の変換方法をC++で実装し, 手法にできるだけ速い方法を用います.
用語
Unicode規格で使われる用語についてまとめます. Unicode規格書(Ver13)を参考にしています.
- "The Unicode standard" Unicode Inc. accessed at 2021-03-31
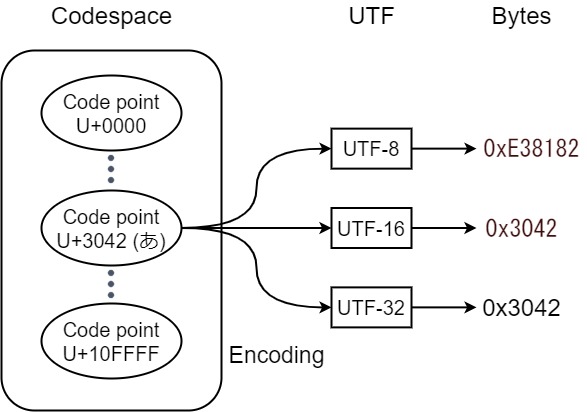
細かな用語説明に入る前に, 全体像を説明しますと, Unicode規格は, 全世界の文字ごとに数値(コードポイント)を割り当て, コンピュータが文字を扱えるようにしています(コードポイントの集合をコードスペースと呼びます). また, Unicode規格は, 各コードポイントをコンピュータのメモリ, ストレージに符号化するための, 符号化方法を定め, これをUTFと呼びます. UTFには種類があり, 代表的なものに, UTF-8, UTF-16, UTF-32があります. 以上をまとめたのを, Fig.1. に示します.
- Unicode codespace (コードスペース)
0x0000 ~ 0x10FFFFの整数の集合[6].
- Code point (コードポイント)
Codespace に属する各値[6]. code position とも呼ばれています[6]. 各Code point は, U+0000からU+10FFFFと表記されています[2]. ("U+"にcode point の値を16進数で加え, 必要に応じて先頭にゼロを付けて, 最小4桁になるようにしています.)
- Plane (面)
Planeは, 連続した65,536(0x10000)個のCode pointのグループです[7]. Plane は, 0~16の番号が割り当てられています.
Unicode planeとcode point の範囲 Planes Code point 範囲 名称 Plane 0 U+0000 ~ U+FFFF Basic Multilingual Plane (BMP) Plane 1 U+10000 ~ U+1FFFF Supplementary Multilingual Plane (SMP) Plane 2 U+20000 ~ U+2FFFF Supplementary Ideographic Plane (SIP) Plane 3 U+30000 ~ U+3FFFF Tertiary Ideographic Plane (TIP) Plane 4-13 U+40000 ~ U+DFFFF - Plane 14 U+E0000 ~ U+EFFFF Supplementary Special-purpose Plane (SSP) Plane 15-16 U+F0000 ~ U+10FFFF Supplementary Private Use Area planes (SPUA-A/B) - Basic Multilingual Plane (BMP)
BMP には, 現代で用いられているほとんどの言語の文字と記号が含まれています.
- Code unit (コードユニット)
処理のために符号化されたテキストの単位を表すことができる最小のビットの組み合わせ[6].
Code unit は, コンピュータのストレージ単位になります.
- Unicode Transformation Format (UTF)
Unicode Transformation Format (UTF)は, すべてのUnicode code point (サロゲート Code point を除く) から一意のバイト列へマッピングします[8][9].
- UTF-8
Code point を8ビット(1バイト)単位(Code unit と呼ぶ)の1バイトから4バイトの可変長バイト列に変換します.
- UTF-16
Code point を1つもしくは2つの16ビット Code unit へ変換します. ちょうど2バイトを超えるU+10000からCode spaceの終わりU+10FFFFまで, 2 code units で表記されます.
2 code units の上位 code unit を High-Surrogate Code Unit, 下位 code unit を Low-Surrogate Code Unit と呼びます[7]. この二つを合わせて, Surrogate Pair (サロゲートペア) と呼びます[7]. High-Surrogate Code Unit, Low-Surrogate Code Unitでとりえる値を持つCode point をそれぞれ, High-Surrogate Code Point, Low-Surrogate Code Point と呼び, この領域には文字が割り当てられていません. Surrogate Code Unit と Surrogate Code Point の関係を, Fig.2. に示します.
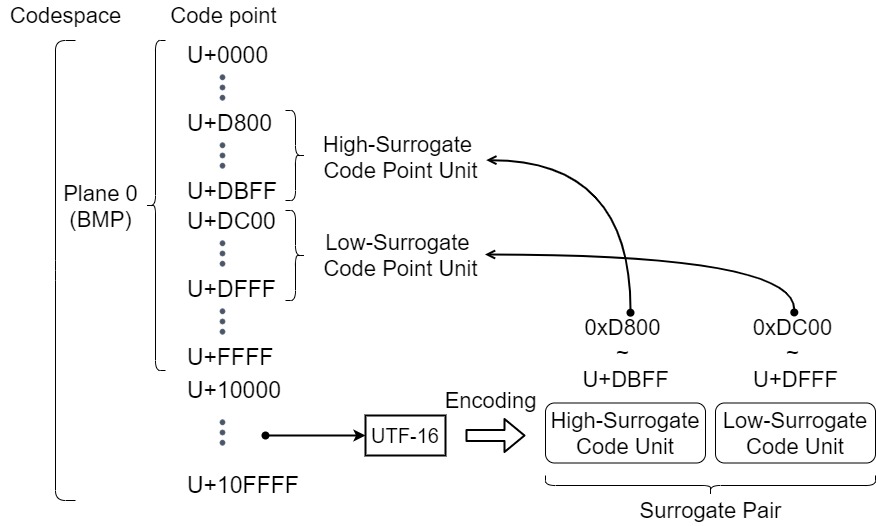
Fig.2. Surrogate Code Unit と Surrogate Code Point の関係 - UTF-32
Code point を1つの固定長32ビット Code unit へ変換します.
UTFの比較 Name UTF-8 UTF-16 UTF-32 下限 Code point U+0000 U+0000 U+0000 上限 Code point U+10FFFF U+10FFFF U+10FFFF Code unit 長 8bits 16bits 32bits 一文字当たりの最小バイト数 1 2 4 一文字当たりの最大バイト数 4 4 4
符号化方法
UTF-8
UTF-8は, Code pointを1~4bytesの可変長で変換します. Code point の範囲に応じて, バイト数が変わります. 次の表に, 符号化の構造を示します. x文字は, Code point のビットに置き換えられます.
| Code point | Byte 1 | Byte 2 | Byte 3 | Byte 4 |
|---|---|---|---|---|
| U+0000 ~ U+007F | 0xxx xxxx | - | - | - |
| U+0080 ~ U+07FF | 110x xxxx | 10xx xxxx | - | - |
| U+0800 ~ U+FFFF | 1110 xxxx | 10xx xxxx | 10xx xxxx | - |
| U+10000 ~ U+10FFFF | 1111 0xxx | 10xx xxxx | 10xx xxxx | 10xx xxxx |
例
あという文字をUTF-8で変換してみます. 手順を以下に示します.
あのCode pointは, U+3042です[10].- U+3042は, U+0800 ~ U+FFFF間にあるので, 3バイトで表現します.
- U+3042をビット表記すると,
0011 0000 0100 0010になります. 先頭の00が追加されたのは, 3バイト表記には, 16個のビットが必要になるからです. - 変換長は3バイトになるので,
1110ではじまります. - 残りの4ビットをU+3042の先頭4ビットからとり, 1バイト目に
1110 0011を得ます. - 2バイト目は,
10から始まり, 残り6ビットをU+3042の5ビット目からとります. よって,1000 0001を得ます. - 3バイト目も,
10から始まり, 残り6ビットをU+3042の10ビット目からとります. よって,1000 0010を得ます.
| 文字 | バイナリ Code point | バイナリ UTF-8 |
|---|---|---|
あ U+3042 | 0011 0000 0100 0010 | 1110 0011 1000 0001 1000 0010 |
UTF-16
UTF-16は, Code pointを1つのcode unit (2バイト)または, 2つのcode unit (4バイト)に変換します. 変換方法は次の3つに分けられ, それぞれの方法ごとにCode pointの範囲があります.
U+0000 ~ U+D7FF, U+E000 ~ U+FFFF
UTF-16は, この範囲のCode point を対応するCode pointと数値として等しい単一の16ビットCode unitとして変換します. この範囲のCode pointは, Plane 0(BMP) に属するCode point から, Surrogate Code Point を除いたものになります.
U+10000 ~ U+10FFFF
UTF-16は, この範囲のCode point を2つの16bit Code unit へと変換します. この2つのCode unit をSurrogate pair と呼びます. 変換の手順は以下の通りです.
- 0x10000 を 変換対象のCode point (U)から引き, 20 bit の数値(U’)を得ます.
- U’の上位10bitに0xD800(1101 1000 0000 0000)を加算し, 16bitのHigh-Surrogate Code Unit (W1)を得ます.
- U’の下位10bitに0xDC00(1101 1100 0000 0000)を加算し, 16bitのLow-Surrogate Code Unit (W2)を得ます.
U’, W1, W2 の計算流れを視覚的に表現したものを以下に示します.
                U' = yyyy yyyy yyxx xxxx xxxx // U - 0x10000
                W1 = 1101 10yy yyyy yyyy yyyy // 0xD800 + yyyyyyyyyy
                W2 = 1101 11xx xxxx xxxx xxxx // 0xDC00 + xxxxxxxxxx
U+D800 ~ U+DFFF
この範囲のCode point をSurrogate Code Point と呼び, 文字が割り当てられることはありません. よって, この範囲を変換する必要はありません.
例
あという文字をUTF-16で変換してみます. 手順を以下に示します.
あのCode pointは, U+3042です[10].- U+3042は, U+0000 ~ U+D7FF, U+E000 ~ U+FFFFの範囲にあるので, そのまま16bitのCode unitへと変換し,
0011 0000 0100 0010を得ます.
🍣という文字をUTF-16で変換してみます. 手順を以下に示します.
🍣のCode pointは, U+1F363です[11].- U+1F363は, U+10000 ~ U+10FFFFの範囲にあるので, 2つのCode unit (Surrogate pair) で表記します.
- 0x1F363 から 0x10000を引き, 0xF363 (
0000 1111 0011 0110 0011) を得ます. - 0xF363の上位10bit に0xD800を加算し, 16bitのHigh-Surrogate Code Unit
1101 1000 0011 1100を得ます. - 0xF363の下位10bit に0xDC00を加算し, 16bitのLow-Surrogate Code Unit
1101 1111 0110 0011を得ます.
| 文字 | バイナリCode point | バイナリUTF-16 |
|---|---|---|
あ U+3042 | 0011 0000 0100 0010 | 0011 0000 0100 0010 |
🍣 U+1F363 | 0001 1111 0011 0110 0011 (0x1F363 - 0x10000 = 0000 1111 0011 0110 0011 ) | 1101 1000 0011 1100 1101 1111 0110 0011 |
UTF-32
UTF-32は, 一つのCode point につき, ちょうど32ビット(4バイト)の固定長で変換します. UTF-32の各32ビット値は, 1つのCode pointを表し, そのCode pointの数値と正確に一致します.
フォーマット間の変換方法
フォーマット間の変換をC++で実装します. 変換のアルゴリズムには, Github上で筆者が速そうだと思ったものを選択しました.
今回参考にしたGithubリポジトリは以下の通りです. 2016年でのICU, libiconv, UTFPPの性能評価によると, UTFPPが約2倍速いことが示されていました[12].
- "Alexhuszagh/UTFPP". Github. accessed at 2021-04-24.
UTFPPを参考にして, 文字のイテレータを追加したものを作成いたしました. 作成したcppファイル, hppファイルを以下にあげます. 本稿では, こちらのスクリプト[注 1]にそって説明します.
- "ContentsViewer/nodec/unicode.cpp". Github. accessed at 2021-04-24.
- "ContentsViewer/nodec/unicode.hpp". Github. accessed at 2021-04-24.
UTF-8 と UTF-32間の変換方法
UTF-8 ⇒ UTF-32
UTF-8のCode unit数を取得する
utf-8の先頭Code unit から, Code unit 数を調べます. Code unit 値から直接Code unit 数へ変換するハッシュを作成します. Code unit 長は1byteで, とりえる値は0~255なので, サイズ256の配列を用意し, 配列の値を0がunit数1になるように順番に割り振ります.
                    const std::array<uint8_t, 256> UTF8_BYTES ={
                        0,0,0,0,0,0,0,0,0,0,0,0,0,0,0,0,  0,0,0,0,0,0,0,0,0,0,0,0,0,0,0,0, // 0000 0000 ~
                        0,0,0,0,0,0,0,0,0,0,0,0,0,0,0,0,  0,0,0,0,0,0,0,0,0,0,0,0,0,0,0,0, // 0010 0000 ~
                        0,0,0,0,0,0,0,0,0,0,0,0,0,0,0,0,  0,0,0,0,0,0,0,0,0,0,0,0,0,0,0,0, // 0100 0000 ~
                        0,0,0,0,0,0,0,0,0,0,0,0,0,0,0,0,  0,0,0,0,0,0,0,0,0,0,0,0,0,0,0,0, // 0110 0000 ~
                        0,0,0,0,0,0,0,0,0,0,0,0,0,0,0,0,  0,0,0,0,0,0,0,0,0,0,0,0,0,0,0,0, // 1000 0000 ~
                        0,0,0,0,0,0,0,0,0,0,0,0,0,0,0,0,  0,0,0,0,0,0,0,0,0,0,0,0,0,0,0,0, // 1010 0000 ~
                        1,1,1,1,1,1,1,1,1,1,1,1,1,1,1,1,  1,1,1,1,1,1,1,1,1,1,1,1,1,1,1,1, // 1100 0000 ~
                        2,2,2,2,2,2,2,2,2,2,2,2,2,2,2,2,                                   // 1110 0000 ~
                        3,3,3,3,3,3,3,3,                                                   // 1111 0000 ~
                        4,4,4,4,                                                           // 1111 1000 ~
                        5,5,5,5                                                            // 1111 1100 ~ 1111 1111
                    };
各Code unitを連結する
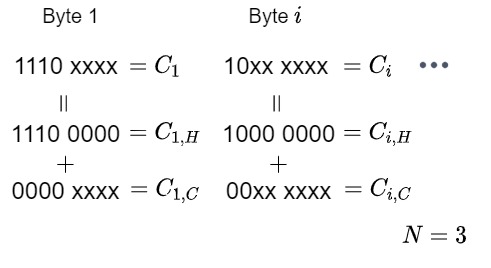
UTF-8の各Code unitのCode point 部分を連結し, 直接Code pointになるUTF-32のCode unit値を取得します. 今, Code unit数 $N$ のUTF-8それぞれのCode unit $C_{i} (i=1,…,N)$があるとします. $C_{i}$の先頭ビット列値(110x xxxx の場合 1100 0000)を$C_{i, H}$とし, Code point 部分の値(110x xxxx の場合 000x xxxx)を$C_{i, C}$と置きます. このとき, $C_{i} = C_{i, H} + C_{i, C}$になります. ($N=3$の場合の説明図をFig.3.に示します.)
求めたいUTF-32のCode unit値 $C_{32}$は, $C_{i, C}$を順番に6bit左シフトして足し合わせたものになるので, 以下の式になります.
さらに式を変形すると,
式(\ref{eq:utf8-utf32})から, UTF-32のCode unit値$C_{32}$は, UTF-8の各Code Unit値 $C_{i}$を順番に6bit左シフトして足し合わせたものから, $Offset (= \sum_{i}^{N} C_{i, H} << 6(N - i))$を引いたものだとわかります.
各$N$ごとの$Offset$値の配列を定めます.
                    const std::array<uint32_t, 6> UTF8_OFFSETS ={
                        0x00000000UL, // 0: 0000 0000 0000 0000 0000 0000 0000 0000
                        0x00003080UL, // 1: 0000 0000 0000 0000 0011 0000 1000 0000
                        0x000E2080UL, // 2: 0000 0000 0000 1110 0010 0000 1000 0000
                        0x03C82080UL, // 3: 0000 0011 1100 1000 0010 0000 1000 0000
                        0xFA082080UL, // 4: 1111 1010 0000 1000 0010 0000 1000 0000
                        0x82082080UL  // 5: 1000 0010 0000 1000 0010 0000 1000 0000
                    };
コード全体
以上を踏まえて, 実装コードは以下のようになります.
                    template <typename Iter8>
                    uint32_t code_point_utf8to32(Iter8& begin, Iter8 end, bool strict)
                    {
                        uint32_t c = 0;
                        uint8_t bytes = UTF8_BYTES[*begin];

                        // check range
                        if (begin + bytes >= end)
                        {
                            // source buffer, check whether or not we have space to replace
                            throw IllegalCharacterException(__FILE__, __LINE__);
                        }

                        // get our UTF-32 character
                        switch (bytes)
                        {
                        case 5:
                            c = check_strict(strict);
                            c <<= 6;
                            // No break. Continue to fall down.
                        case 4:
                            c = check_strict(strict);
                            c <<= 6;
                        case 3:
                            c += *begin++; // uint32_t = uint32_t + uint8_t
                            c <<= 6;
                        case 2:
                            c += *begin++;
                            c <<= 6;
                        case 1:
                            c += *begin++;
                            c <<= 6;
                        case 0:
                            c += *begin++;
                        }
                        c -= UTF8_OFFSETS[bytes];

                        return c;
                    }
UTF-32 ⇒ UTF-8
UTF-8のCode unit数を求める
UTF-32のCode unit値からUTF-8のCode unit数を求めます. Code pointの範囲によって Code unit数が決まるので, 以下のようにCode unit数を求めます. cはUTF-32のCode unit値, bytesはCode unit数です.
                    // caliculate bytes to write
                    short bytes;
                    if (c < 0x80)         // 1000 0000
                    {
                        bytes = 1;
                    }
                    else if (c < 0x800)   // 1000 0000 0000
                    {
                        bytes = 2;
                    }
                    else if (c < 0x10000) // 0001 0000 0000 0000 0000
                    {
                        bytes = 3;
                    }
                    else if (c <= max_utf32)
                    {
                        bytes = 4;
                    }
                    else
                    {
                        bytes = 3;
                        c = check_strict(strict);
                    }
Code point を各Code unit へ分割する
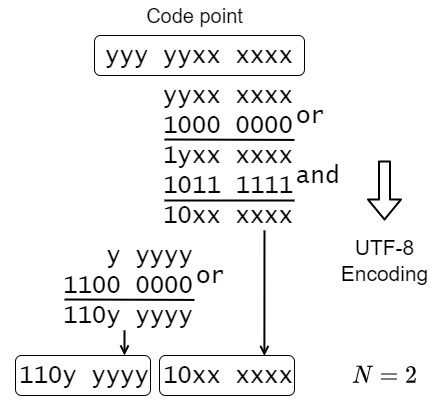
Code pointを, UTF-8の各Code unitへ分割します. Code pointの下位6ビットずつ処理をして, 先頭フラグ(10xx xxxxなど)を立て, マスクします. Code unit数$N$が2の時の変換例をFig.4.に示します.
Code unit 数に応じた先頭Code unitのフラグはあらかじめ定義しておきます.
                    const std::array<uint8_t, 7> FIRST_BYTE_MARK ={
                        0x00, // 0: 0000 0000
                        0x00, // 1: 0000 0000
                        0xC0, // 2: 1100 0000
                        0xE0, // 3: 1110 0000
                        0xF0, // 4: 1111 0000
                        0xF8, // 5: 1111 1000
                        0xFC  // 6: 1111 1100
                    };
コード全体
以上を踏まえて, 実装コードは以下のようになります.
                    template <typename Iter8>
                    void code_point_utf32to8(uint32_t c, Iter8& begin, Iter8 end, bool strict)
                    {
                        // limits
                        constexpr uint32_t max_utf32 = 0x0010FFFF;
                        constexpr uint32_t byte_mark = 0x80; //! 1000 0000
                        constexpr uint32_t byte_mask = 0xBF; //! 1011 1111

                        // caliculate bytes to write
                        short bytes;
                        if (c < 0x80)         // 1000 0000
                        {
                            bytes = 1;
                        }
                        else if (c < 0x800)   // 1000 0000 0000
                        {
                            bytes = 2;
                        }
                        else if (c < 0x10000) // 0001 0000 0000 0000 0000
                        {
                            bytes = 3;
                        }
                        else if (c <= max_utf32)
                        {
                            bytes = 4;
                        }
                        else
                        {
                            bytes = 3;
                            c = check_strict(strict);
                        }

                        // check range
                        if (begin + bytes > end)
                        {
                            throw BufferRangeException(__FILE__, __LINE__);
                        }

                        // write to buffer
                        begin += bytes;
                        switch (bytes)
                        {
                        case 4:
                            *--begin = static_cast<uint8_t>((c | byte_mark) & byte_mask);
                            c >>= 6;
                        case 3:
                            *--begin = static_cast<uint8_t>((c | byte_mark) & byte_mask);
                            c >>= 6;
                        case 2:
                            *--begin = static_cast<uint8_t>((c | byte_mark) & byte_mask);
                            c >>= 6;
                        case 1:
                            *--begin = static_cast<uint8_t>(c | FIRST_BYTE_MARK[bytes]);
                        }
                        begin += bytes;
                    }
UTF-16 と UTF-32間の変換方法
UTF-16 ⇒ UTF-32
Surrogate Pairであるか確認する
先頭Code unit値が, High-Surrogate Code Point であり, 次のCode unit値が, Low-Surrogate Code Point である場合, 文字は, Surrogate Pair で表現されています. コードで表すと次の通りです. beginはCode unit へのポインタです.
                    constexpr uint32_t high_begin = 0xD800;
                    constexpr uint32_t high_end = 0xDBFF;
                    constexpr uint32_t low_begin = 0xDC00;
                    constexpr uint32_t low_end = 0xDFFF;

                    const uint32_t c1 = *begin++;
                    if (c1 >= high_begin && c1 <= high_end)
                    {
                        const uint32_t c2 = *begin++;
                        if (c2 >= low_begin && c2 <= low_end)
                        {
                            // surrogate pair
                        }
                    }
Code unitを連結する
Surrogate Pairではない場合, Code unit値がCode pointになります.
Surrogate Pairの場合, High-Surrogate Code Unit から0xD800を引いたのち10bit左シフトし, Low-Surrogate Code Unit から0xDC00をひたものを足し合わせ, 0x10000足したものが, 求めたいCode pointになります(Surrogate Pair の変換手順は, 上記セクション"U+10000 ~ U+10FFFFのUTF-16符号化方法"を参照してください). コードで表すと次の通りです.
                    constexpr int      shift = 10;
                    constexpr uint32_t base = 0x0010000UL;

                    ((c1 - high_begin) << shift) + (c2 - low_begin) + base;
コード全体
以上を踏まえて, 実装コードは以下のようになります.
                    template<typename Iter16>
                    uint32_t code_point_utf16to32(Iter16& begin, Iter16 end, bool strict)
                    {
                        // limits
                        constexpr uint32_t high_begin = 0xD800;
                        constexpr uint32_t high_end = 0xDBFF;
                        constexpr uint32_t low_begin = 0xDC00;
                        constexpr uint32_t low_end = 0xDFFF;
                        constexpr int      shift = 10;
                        constexpr uint32_t base = 0x0010000UL;

                        const uint32_t c1 = *begin++;
                        if (c1 >= high_begin && c1 <= high_end)
                        {
                            // surrogate pair
                            const uint32_t c2 = *begin++;
                            if (c2 >= low_begin && c2 <= low_end)
                            {
                                return ((c1 - high_begin) << shift) + (c2 - low_begin) + base;
                            }
                            else
                            {
                                return check_strict(strict);
                            }
                        }
                        else if (c1 >= low_begin && c1 <= low_end)
                        {
                            return check_strict(strict);
                        }
                        else
                        {
                            return c1;
                        }
                    }
UTF-32 ⇒ UTF-16
Code point が, Surrogate Pair で表すものか確認する
U+FFFFより後半のCode point (BMP以降のPlaneに属するCode point) は, Surrogate Pairで表現されます. BMP内のCode pointは, Surrogate Pair を用いません.
Code unit に分割する.
BMP内のCode pointは, Surrogate Pair を使わないため, Code pointがそのままCode unit の値になります.
Surrogate Pair を用いるCode point は, 上記セクション"U+10000 ~ U+10FFFFのUTF-16符号化方法"に従って, 二つのCode unit へ変換します.
コード全体
以上を踏まえて, 実装コードは以下のようになります.
                    template <typename Iter16>
                    void code_point_utf32to16(uint32_t c, Iter16& begin, Iter16& end, bool strict)
                    {
                        // limits
                        constexpr uint32_t max_utf32 = 0x0010FFFF;  //! max unicode code space size
                        constexpr uint32_t high_begin = 0xD800;     //! 1101 1000 0000 0000
                        constexpr uint32_t low_begin = 0xDC00;      //! 1101 1100 0000 0000
                        constexpr uint32_t max_bmp = 0x0000FFFF;    //! Basic Multilingual Plane (BMP)
                        constexpr int      shift = 10;
                        constexpr uint32_t base = 0x0010000UL;      //! 0001 0000 0000 0000 0000
                        constexpr uint32_t mask = 0x3FFUL;          //! 0000 0011 1111 1111

                        // variables
                        if (c <= max_bmp)
                        {
                            if (c >= high_begin && c <= low_begin)
                            {
                                *begin++ = check_strict(strict);
                            }
                            else
                            {
                                *begin++ = static_cast<uint16_t>(c);
                            }
                        }
                        else if (c > max_utf32)
                        {
                            *begin++ = check_strict(strict);
                        }
                        else
                        {
                            if (begin + 1 > end)
                            {
                                throw BufferRangeException(__FILE__, __LINE__);
                            }

                            c -= base;
                            *begin++ = static_cast<uint16_t>((c >> shift) + high_begin);
                            *begin++ = static_cast<uint16_t>((c & mask) + low_begin);
                        }
                    }
UTF-8 と UTF-16間の変換方法
UTF-8 ⇒ UTF-16
UTF-8をUTF-32に変換して, UTF-32をUTF-16へと変換します.
UTF-16 ⇒ UTF-8
UTF-16をUTF-32に変換して, UTF-32をUTF-8へと変換します.
おわりに
以上, Unicode規格の基本を学び, UTF-8, UTF-16, UTF-32間の変換方法をC++を使って実装しました. 本手法に基づいて, C++でUnicode規格に沿った文字列ライブラリ([C++ライブラリ/C++でUnicode文字列(UTF-8, UTF-16, UTF-32)を扱うライブラリ])を作成しましたので参考にしてみてください.
注釈
- ^ こちらのスクリプトは, nodec プロジェクト([Welcome!/[redirect] nodec (GameEngine)])に属します. nodecプロジェクトは, 筆者が自作でゲームエンジンを作成することを目指したプロジェクトで, 作成過程で得られるプログラミング技術の習得が主な目的です.
参考文献
- ^ a b "Usage statistics of character encodings for websites". W3Techs. accessed at 2021-04-05
- ^ a b c "Unicode". Wikipedia. accessed at 2021-03-30
- ^ "Unicode HOWTO". Python. accessed at 2021-04-21.
- ^ ".NET での文字エンコード". Microsoft. accessed at 2021-04-21.
- ^ "UTF-8エンコーディングされた文字の型としてchar8_tを追加". cpprefjp. accessed at 2021-04-21.
- ^ a b c d "The Unicode standard". Unicode Inc. accessed at 2021-03-31.
- ^ a b c "Glossary of Unicode Terms". Unicode Inc. accessed at 2021-03-30.
- ^ "UTF-8, UTF-16, UTF-32 & BOM". Unicode Inc. accessed at 2021-04-05.
- ^ "UTF". Weblio. accessed at 2021-04-05.
- ^ a b "Unicode一覧 3000-3FFF". Wikipedia. accessed at 2021-04-22.
- ^ "UnicodeのEmojiの一覧". Wikipedia. accessed at 2021-04-22.
- ^ "Alexhuszagh/UTFPP". Github. accessed at 2021-04-24.